Ready to give your lawn a fresh start? Late summer is a great time for sod installation and revitalize your yard. The warm soil and cooler weather create perfect conditions for grass roots to establish. By starting in late summer, your sod will have enough time to take root before winter arrives.
Installing sod can seem like a big job, but with the right steps, it’s totally doable. From choosing the right type of sod to preparing your soil, each step is essential for a healthy lawn. The process includes laying the sod correctly, making sure it’s watered well, and keeping it free from weeds and pests.
In this guide, we’ll walk you through everything you need to know about installing sod in late summer. Whether you’re a seasoned gardener or a first-time homeowner, these tips will help you achieve a lush, green lawn that makes your yard the envy of the neighborhood.
Why Late Summer Is Ideal for Sod Installation

Late summer offers prime conditions for installing sod. The soil is warm, which helps the sod’s roots establish quickly. This is crucial for the grass to survive and thrive before the cooler months set in. Plus, the weather starts to cool down, reducing the stress on the new sod from extreme heat.
Another benefit is the likelihood of more regular rainfall in late summer. This natural watering helps keep the sod moist, which is essential for root development. With a good balance of sun and rain, late summer creates the perfect environment for sod to adapt and grow.
By choosing late summer for sod installation, you give your lawn a head start. The grass has ample time to take root and strengthen before winter, leading to a healthier, more resilient lawn come spring.
Choosing the Right Sod for Your Lawn
Selecting the right type of sod is the first step to a successful lawn. Different grass varieties have specific needs and characteristics. Some are better suited for shady areas, while others thrive in full sun. In Central Florida, popular choices include St. Augustine, Bermuda, and Zoysia.
St. Augustine grass is known for its thick, lush appearance and does well in both sun and shade. Bermuda grass is hardy and tolerates heat and traffic, making it ideal for active households. Zoysia grass is drought-resistant and grows well in different types of soil.
Consider your lawn’s specific conditions, such as sunlight, soil type, and foot traffic, when deciding which sod to install. A local turf specialist can provide valuable advice on the best grass type for your area.
Preparing Your Soil: First Steps
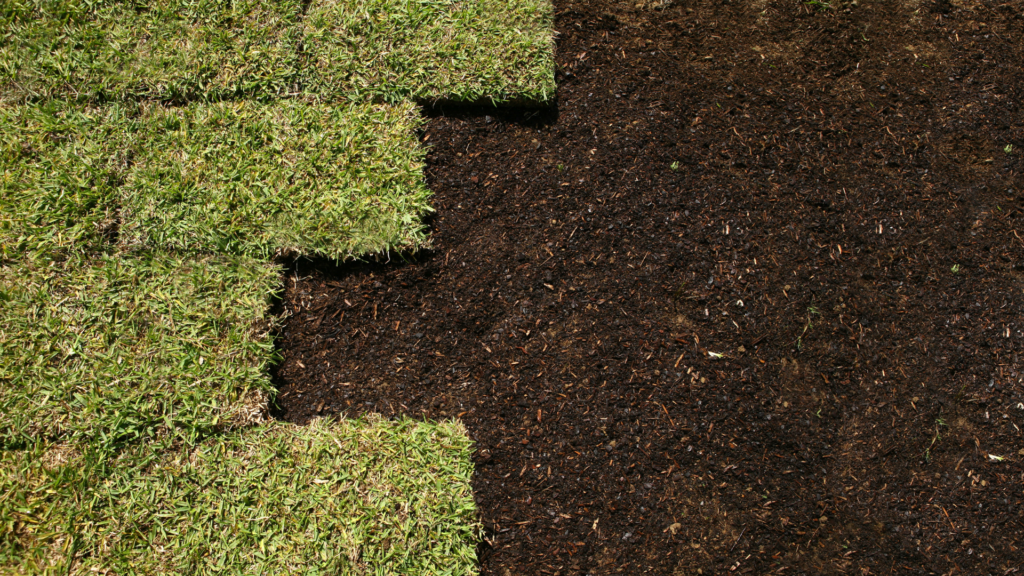
Proper soil preparation is key to successful sod installation. Start by clearing the area of any debris, rocks, and old grass. This gives your new sod a clean slate to grow on. Use a shovel or sod cutter to remove the existing grass and weeds.
Next, test your soil’s pH level using a soil test kit. Most grasses prefer a pH range between 6 and 7. If your soil is too acidic or alkaline, you can adjust it with lime or sulfur products. Follow the manufacturer’s instructions for the best results.
After testing, till the soil to a depth of about 4-6 inches. This loosens the soil, making it easier for the new roots to penetrate. Add organic matter like compost or peat moss to improve soil structure and fertility. Level the area with a rake, ensuring a smooth, even surface for the sod.
Tools You’ll Need for Sod Installation
Having the right tools can make sod installation smoother and more efficient. Here are some essential tools you’ll need:
- Sod Cutter: Handy for removing old grass and weeds.
- Shovel: Helps in digging and clearing debris.
- Rake: Useful for leveling the soil and creating a smooth surface.
- Wheelbarrow: Makes it easier to transport sod and soil amendments.
- Measuring Tape: Ensures you cut and lay sod accurately.
- Garden Hose and Sprinkler: Necessary for watering the new sod.
- Lawn Roller: Helps the sod make good contact with the soil.
- Utility Knife: Useful for cutting sod to fit around edges and obstacles.
Gathering these tools before you start will save you time and effort. Good preparation leads to a more successful sod installation, helping your lawn look its best.
Step-by-Step Guide to Laying Sod
Laying sod is straightforward if you follow these steps:
- Plan Your Layout: Start at a straight edge, like a sidewalk or driveway. Lay the first row of sod along this edge.
- Unroll the Sod: Carefully unroll each sod piece, fitting it snugly against the previous piece. Avoid overlapping or leaving gaps.
- Stagger the Seams: Arrange each new row so the seams are offset from the previous row, like bricks. This helps the sod knit together better.
- Cut to Fit: Use a sharp knife to trim sod around curves, edges, or obstacles like trees and flower beds.
- Roll the Sod: Once laid, go over the sod with a lawn roller. This removes air pockets and ensures good contact with the soil.
By following these steps, you’ll create a uniform, healthy lawn that establishes quickly and looks great.
Tips for Proper Sod Alignment and Cutting
Proper alignment and cutting are essential for a neat, professional-looking lawn. Here are some tips:
- Align the Edges: Always start laying sod along a straight edge to keep rows straight. Use a string line if needed.
- Avoid Gaps: Lay each piece tightly against its neighbor to prevent gaps where weeds can grow.
- Stagger Seams: Staggered seams help the sod pieces blend together, reducing the chance of visible lines.
- Use a Sharp Knife: For clean cuts around obstacles or edges, use a utility knife. Dull tools can tear the sod and leave ragged edges.
- Shape Carefully: Take your time cutting around curves and flower beds to avoid mistakes.
By focusing on alignment and careful cutting, your sod will settle in better and look more cohesive.
Watering Your Newly Installed Sod
Watering is crucial for newly installed sod. Here’s how to do it right:
- First Watering: Water your sod within 30 minutes of installation. This helps settle the soil and sod.
- Daily Care: For the first two weeks, keep the sod and soil moist. Water early in the morning to reduce evaporation.
- Gradual Reduction: After two weeks, start reducing the watering frequency. Water deeper but less often to encourage strong root growth.
- Check Moisture: Regularly check the moisture level. Insert a screwdriver into the soil; it should go in easily if the soil is moist.
Proper watering helps the sod roots establish in the soil, giving you a lush, green lawn.
Fertilizing for Strong Sod Growth
Fertilizing your new sod helps promote healthy growth. Here are the steps:
- Choose the Right Fertilizer: Use a balanced, slow-release fertilizer. Look for one with equal amounts of nitrogen, phosphorus, and potassium.
- Initial Application: Fertilize your sod about 4-6 weeks after installation. This gives the roots time to establish first.
- Ongoing Care: Plan to fertilize your lawn every 6-8 weeks during the growing season. Follow the instructions on the fertilizer package for the correct amount.
- Water After Fertilizing: Always water your lawn after applying fertilizer. This helps the nutrients reach the roots and reduces the risk of burning the grass.
Regular fertilization keeps your lawn healthy, vibrant, and able to resist pests and diseases.
Managing Weeds and Pests Post-Installation
After laying your new sod, managing weeds and pests is crucial to maintaining a healthy lawn. Here’s how to keep these invaders at bay:
Weed Control Tips:
- Early Detection: Regularly inspect your lawn for weeds. Early removal prevents them from spreading.
- Mow Properly: Keep your grass at the recommended height. Taller grass can shade out weeds.
- Use Herbicides Carefully: If weeds become a problem, use a selective herbicide that targets weeds without harming the sod.
Pest Control Tips:
- Identify Pests: Different pests affect lawns differently. Identify which pests are present to choose the right treatment.
- Natural Predators: Introducing beneficial insects like ladybugs can help control pest populations.
- Chemical Treatments: If necessary, use pesticides labeled for sod. Follow instructions to avoid damaging your lawn.
Common Mistakes to Avoid
Avoiding common mistakes during and after installation can ensure your sod thrives. Here are some pitfalls to watch out for:
- Improper Soil Preparation: Failing to prepare the soil can lead to poor root development. Always test soil pH and add amendments if needed.
- Wrong Installation Timing: Don’t install sod during extreme temperatures. Late summer is ideal because of the warm soil and cooler air.
- Incorrect Watering: Overwatering can cause root rot, while underwatering can dry out the sod. Follow watering guidelines closely.
- Not Rolling the Sod: Failing to roll the sod can leave air pockets, preventing roots from establishing. Always use a roller after installation.
Caring for Your Sod in the First Few Weeks
The first few weeks are critical for your new sod. Here’s how to care for it:
Watering:
- Initial Watering: Water immediately after installation to help roots settle.
- Daily Watering: For the first week, water daily to keep the soil moist. Avoid overwatering.
- Adjust as Needed: After the first week, gradually reduce watering frequency but increase duration. This helps roots grow deeper.
Fertilizing:
- Wait to Fertilize: Hold off on fertilizing until the sod starts to establish, usually about three weeks.
- Slow-Release Fertilizer: Use a slow-release fertilizer to provide steady nutrients.
How Next Level Turf Can Help with Your Sod Installation
Installing sod can be a complex process, but with professional help, you can have a lush lawn in no time. At Next Level Turf, we offer comprehensive sod installation services to ensure your lawn stays green and healthy.
What We Offer:
- Expert Consultation: We help you choose the best sod type for your lawn’s specific conditions.
- Quality Installation: Our team handles everything from soil preparation to the final roll, ensuring perfect installation.
- Post-Installation Care: We provide guidelines for watering, fertilizing, and maintaining your new sod to help it thrive.
Conclusion
Getting your lawn in top shape with new sod involves more than just laying down grass. From managing weeds and pests to avoiding common mistakes and caring for your new sod in the crucial first weeks, there’s a lot to consider. These steps ensure that your new sod will establish well and grow into a beautiful, lush lawn.
If you need professional assistance, Next Level Turf is here to help. We offer expert sod installation services to give your lawn the best start. Contact us today to schedule a consultation and let Next Level Turf take your sod installation to the next level, ensuring a lawn that stays green and healthy for years to come.


Post a comment